ESP8266 Quick Start
This page is meant to be a quick introduction to the ESP8266 for those who are confused by all of the information available on the various blogs and forums who just want to try out this exciting board in the shortest possible time. This guide is for Windows users who want to use the NodeMCU environment.
Not counting waiting for hardware to ship to you (1-10 days), you should be able to use your ESP8266 for something useful in less than an hour. Ready?
What do I need to buy?
You will need an ESP8266 development board. There are several ESP8266 boards available, usually numbered ESP-01 through ESP-12. Check the pins of the actual board you order with the information from your source as the rapid development of these products has led to confusion and duplication of board identification numbers.
The prices vary from around $2 for a simple ESP-01 to $15 for a complete board with USB to serial and 3.3 volt regulator. The ESP-01 is a simple board to start with. The ESP-12 is popular because of its size and the number of pins brought to the side of the board. Recently, more development boards have become available with additional sensors, relays, LEDs and voltage regulators on the board.
A 3 volt power supply. The ESP8266 runs on anything from 2.8 to 3.5 volts, so a couple of AA batteries will work. Most of us use a 3.3 volt regulated power source. Maximum current draw is 300 mA, so use a supply that can supply 500 mA to be safe. More is better. A weak or poor quality supply will cause the board to reset unexpectedly and make debugging difficult. The NodeMCU Development Board has a USB to 3.3V power supply on the board.
A USB to serial adapter. This should be a 3.3 volt compatible model. It is possible to level convert if you already have a 5 volt adapter. The NodeMCU Development Board has the USB to serial interface on the board. When you receive your adapter, verify that the actual voltage output is 3.3 volts as some cheap adapters have been found to be mislabelled. Any of the following should work: FTDi, CH340, FT232RL.
What do I need to download?
The ESP8266 board you bought may have one of many different firmware versions on it. Many come with AT firmware for serial communications. Some come with no user firmware at all. I recommend the NodeMCU Lua firmware as a starting point because it gives you an interactive programming language which allows you to experiment and build simple working programs without a lot of effort. If you are not familiar with Lua, you will find that it is not hard to learn, at least for the simple tasks needed to get started.
The tool you will use to flash the NodeMCU firmware on your ESP8266 board is the nodemcu-flasher. It is open source on github. Go to the nodemcu-flasher page and choose Win32 or Win64 depending on your computer system. Click on ESP8266Flasher.exe and then right click on View Raw and Save Link As... to download the application to your PC. Or use the direct links below:
ESP8266Flasher.exe for Win32
ESP8266Flasher.exe for Win64
What do I have to connect?
The actual connections will depend on the board you have and the USB to serial adapter you are using.
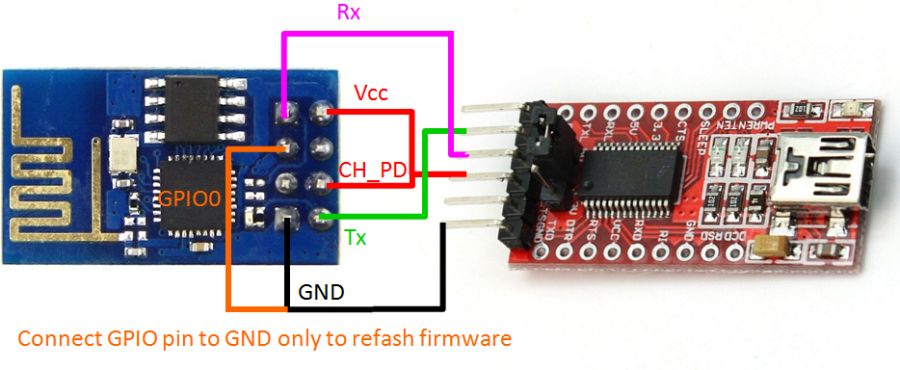
- Power.
- +3.3 volts to Vcc
- ground
- Communications.
- TxD on the board to RxD on the adapter
- RxD on the board to TxD on the adapter
- Ground
- Jumpers.
- Connect Vcc to CH_PD to enable the chip
- Connect GPI0 to GND to enable flash reprogramming
How do I install NodeMCU on my ESP8266?
Plug the USB to serial adapter into your PC. Most adapters are automatically recognized by Windows 7 and 8. Users of XP or older versions of Windows may need a driver which should be supplied by the manufacturer of the USB adapter. The adapter will appear as a new COM port on your system. Check the Device Manager if necessary.
Run ESP8266Flasher.exe

If you only have one COM device, the port will appear automatically. If you have more than one, select the correct one from the drop down menu.
The flasher program comes with default NodeMCU firmware in memory. This is unlikely to be the latest version, but to get started quickly, use the default internal image. Later, you can download the latest firmware, then select the [Config] tab and choose the new .bin file. Select the 0x7C000 default and 0x7E000 blank sections. Uncheck the box for the 0x10000 IROM section.
Click on Flash(E) to start the programming process. If the MAC addresses don't appear within a few seconds, disconnect the power to the board and reconnect it. If it still doesn't work, check your connections. Make sure that the jumper between GND and GPIO0 is there so that the board is in reflash mode.
Reflashing the chip will take a couple of minutes. When the job is done, disconnect power from the board and remove the jumper from GND to GPIO0 to leave reflash mode.
You are now ready to program the ESP8266 for your own application.
How do I communicate with the ESP8266?
The NodeMCU Lua firmware you have just installed communicates with the PC over the serial link. You can use PuTTY, SimpleTerm, or any other terminal program that you like to write Lua programs or enter direct commands to the board. The default speed is 9600 baud, but that can be changed to any other baud rate once you have established communications.
LuaLoader
LuaLoader is a Windows program for uploading files to the ESP8266 and working with the Lua serial interface. As well as being a simple terminal program, it has built in Lua command buttons that make it easy to interact and experiment with the ESP8266 board.
Download: LuaLoader.zip
LuaLoader.exe is a simple Windows application that requires no special installation.
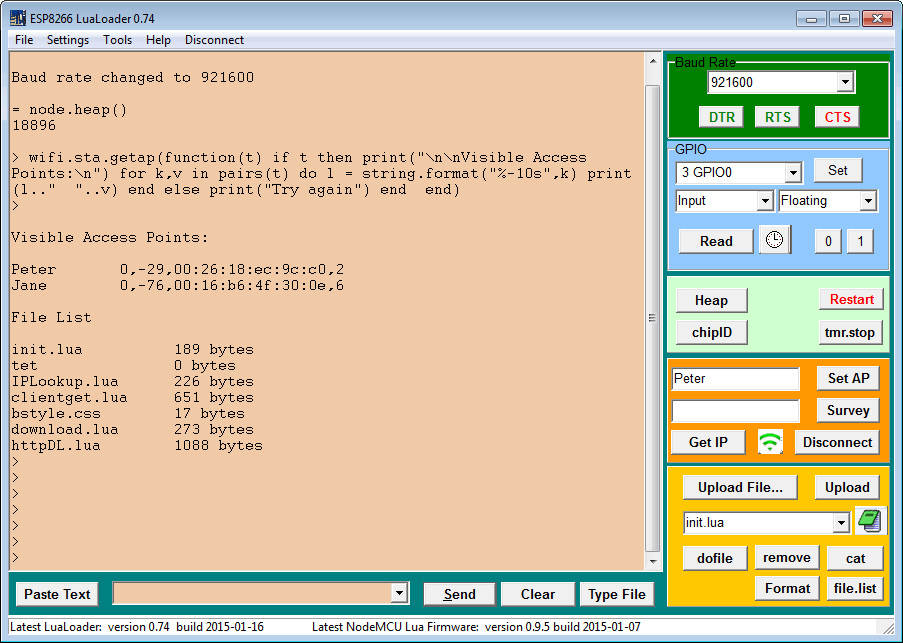
From the Settings menu, select COM Port Settings and choose the appropriate COM port for your USB to serial adapter. Don't change any other setting.
Clicking buttons on LuaLoader sends commands to the board. Power your board and watch for the initial message. After displaying some funny characters (these are firmware reset parameters sent at 74880 baud), you should see the version information of the NodeMCU build:
NodeMCU 0.9.5 build 20150107 powered by Lua 5.1.4
LuaLoader will warn you if a later firmware build is available.
After booting, NodeMCU will attempt to run a file called init.lua in flash memory. Since you haven't put it there, it will report an error and show the > prompt. You are now ready to interact with Lua on the ESP8266.
 Click the Heap button to display the amount of RAM available.
LuaLoader will type the command = node.heap() and the ESP8266 will respond
with 23016 or some other value, followed by the > prompt again.
How do I connect to an Access Point?
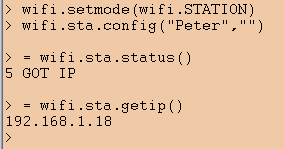 Enter the SSID and password of your closest access point in the appropriate text box on LuaLoader.
Click Set AP. LuaLoader will type the commands to set the WiFi mode and connect.
This information is saved in flash memory and will be remembered until changed, even if the
board is powered down.
Click the  WiFi button to check the connection status.
Click Get IP to confirm that the ESP8266 is connected to your access point.
 Click the Survey button to list the available access points visible to the ESP8266.
The SSID, authentication mode, signal strength, MAC address and channel are shown.
All of the commands typed by LuaLoader can be entered manually, or saved in a file to be run automatically.
How do I read a GPIO input?
The Lua function gpio.read(pin) reads the value of the input specified by pin if the GPIO has been set up as an input.
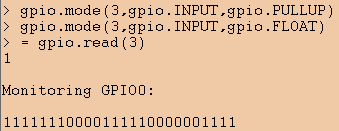 LuaLoader makes this easy to test. Select pin 3 GPIO0 from the GPIO dropdown
menu, select input and floating from the mode dropdown menus. Click Set. Then, click Read. The current pin
value will be 0 or 1. In this case, 1 as that pin is held high normally.
Note that if GPIO0 is low on reset, the chip will enter reflashing mode, so you must ensure that any use of that GPIO0 for user input is high when the device is powered on or reset.
To read the value of the input pin repeatedly, in LuaLoader, click on the clock beside the Read button. Note, that if you are using the NodeMCU development board, the button marked FLASH will change the value from 1 to 0 when the button is pressed as it is connected to GPIO0 and ground. The read rate can be changed in the Settings menu.
How do I send data to a server?
The demo script httpget.lua connects to this webserver and sends the time it took to connect (in microseconds) and the amount of heap (RAM) available at that time.
Download the script to your computer, then upload it to your ESP8266 using the Upload File button.
-- tested on NodeMCU 0.9.5 build 20141222...20150108
-- sends connection time and heap size to https://benlo.com/esp8266/test.php

print('httpget.lua started')
Tstart  = tmr.now()

conn = nil
conn = net.createConnection(net.TCP, 0)

-- show the retrieved web page

conn:on("receive", function(conn, payload)
                       success = true
                       print(payload)
                       end)

-- once connected, request page (send parameters to a php script)

conn:on("connection", function(conn, payload)
                       print('\nConnected')
                       conn:send("GET /esp8266/test.php?"
                        .."T="..(tmr.now()-Tstart)
                        .."&heap="..node.heap()
                        .." HTTP/1.1\r\n"
                        .."Host: benlo.com\r\n"
                        .."Connection: close\r\n"
                        .."Accept: */*\r\n"
                        .."User-Agent: Mozilla/4.0 "
                        .."(compatible; esp8266 Lua; "
                        .."Windows NT 5.1)\r\n"
                        .."\r\n")
                       end)

-- when disconnected, let it be known
conn:on("disconnection", function(conn, payload) print('\nDisconnected') end)

conn:connect(80,'benlo.com')
Connect to your access point first using the Set AP button. This is not normally necessary if you have set the correct AP since the last time you flashed new firmware.
Use the dofile button to run the file you have just uploaded.
The contents of the retrieved page should be displayed.
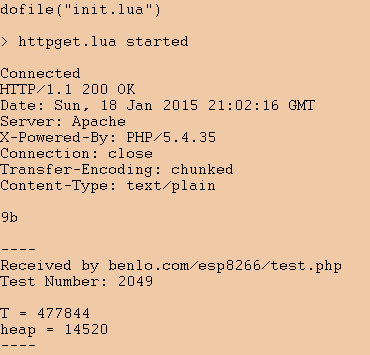
Feel free to use my server for a few tests, but please change to your own webserver or sign up for one of the public internet of things servers, such as thingspeak.com. Claudiuchiru has posted an example of sending temperature (using an inexpensive BS18B20 I2C sensor) to thingspeak.com.
This simple script is all it takes to make useful gadgets from the simplest ESP-01 board. The board can be connected so that it receives power when a device is on, a button is pressed, motion is detected, a magnet trips a reed switch, etc. etc.
The php script will receive the signal and can be programmed to send an email, send an sms, push a notification to your phone, or simply log events for future reference.
Our well pump is now monitored by an ESP-01 running a simple script once every 30 seconds when the power is on. As well as logging the activity and sending a daily email report, the script sends out emergency notifications if the pump runs for more than 2 hours, or hasn't run for more than 36 hours.
A motion detector with a relay turns on another ESP-01 which runs the same program but calls a different php script to alert me when there is motion in front of the house. My phone receives the alert before the doorbell is pressed.
How do I make the program run automatically?
When the ESP8266 starts, it runs the init.lua file. Simply create a file called init.lua which runs the file with your program instructions. It is also a good place to initialize any variables you are using, such as the SSID of the access point. While debugging, it is a good idea to use a timer to call your file after a few seconds. If you make a mistake, causing a crash, you will have a few seconds to stop the timer with the tmr.stop button before the program starts to run again. For the example above, one line will do:
tmr.alarm(0,10000,0,function() dofile('httpget.lua') end)
Arm timer number 0 to execute the function dofile('httpget.lua') in 10 seconds.
How can I learn more?
The Help menu of LuaLoader has a large number of links to ESP8266 and Lua resources for convenient access while programming. There is also a menu item linking files on your computer you may have downloaded for reference.
- NodeMCU Lua API Reference
- The esp8266 community forum. Lots of sample scripts.
- Technical Overview of the ESP8266 by Nurdspace
- Lua.org, home of the Lua language.
- NodeMCU github Lua source and latest binaries
- Espressif Systems, manufacturer of the ESP8266
If you found this page useful, you can buy me a beer. Donations to support this web site let me know that my efforts are appreciated. You can use PayPal, credit card, or bitcoin. No amount is too small.
